For my new game, it has a mouse. So im taking a small pole on which color is preferred! Could you comment with your favourite? :) thank you

For my new game, it has a mouse. So im taking a small pole on which color is preferred! Could you comment with your favourite? :) thank you
This is the last Roman Blog. Sadly I have been meaning to do this for a month, but I came down with Covid, and other things took priority.
Anyway here we are! To begin, in the last blog we were left with a t posed model fully textured.

The next step is to prep it for presentation.
Usually unless I need to rig it, for my own portfolio, in Zbrush I will use transpose master, masking, and layers to pose the model. In this case, before hand, I took a video of myself in the various poses. Just to see the best places for where the feet, legs and arms would position naturally. Grabbed stills from the videos, and used them as reference while I slowly posed the model.
I showed this in more detail in my Jinx video tutorial recently, but when posing I usually move a few elements, take it out of transpose, then repeat the process for the next part to move. This is since if you move far too much sometimes the transpose wont transpose due to errors.
With layers to control the movements in transpose, if an element, such as a belt, gets mashed up in the pose, you can turn off a layer or too, till its correct again, and even use a morph and repose.
The final step was to transfer the smoothing info in maya from the t pose to the new posed model since the smoothing is lost in zbrush. Its a bit time consuming, but prevents any odd smoothing after the bake.
After this, I sent the final models into marmoset toolbag in this case, to check the pose at all angles, and test some lighting setups. I then produced some assets to lend weight to the scene. When I had the idea of posing with sitting on a log and holding a torch, I blocked out cylinders to show these elements, but at this stage I modelled them up also and textured them. Since I wasn’t concerned about if the assets had adequate topo, the main focus was the character, I also zremeshed and occasionally decimated to get the low poly meshes I needed for the camp fire and torch.
The only really difficult element, was something I hadn’t tried before. The fire. In the end I textured planes first, checking reference, and then placed them, testing it in marmoset. The flames still weren’t appearing as realistic as I wanted, but what really pushed the fire was twisting and bending the fire elements, so that at all angles there was something pleasing to see, dropping it out of the flat plane look.

The camp fire itself used a emissive I created from the ao, so in cracks and deep shadowy areas of the camp fire the embers would burn, and this jelled well with the fire itself. Making the scene work well together.
Final lighting for all poses, the camp fire, the torch and the standing, I created in separate scenes, using a slight ambience lighting from the sky light, a key, rim etc. and a light or two dotted around the fire itself to give that glow.


Again sorry for the wait for this last part, I became pretty ill (even though it was mild covid) so when out of bed, I just plodded on with modelling, since any real thought, and even composing a blog, was just too much for my wee brain at the time.
you can see the final scenes here -
https://www.artstation.com/artwork/18WkVL
All the best everyone and stay safe, I hope this blog was useful!
Thank you
Hi all,
This is the second to last Blog for the AAA Roman character. Todays post will be about hair and fur. Mainly fur, since there are so many tutorials on hair out there that im sure can explain better than I.
I use Xgen in maya, with one plane, that I grow the strands from, when happy with a clump, I make it geo, and move it to the side before reworking the fur clump again, and following the same process. I aim for one very thick clump of hair, then thinner hair that is slightly see through, and then thin strands to very thin odd hairs.

After this I renamed the various clumps as fur_1_high, fur_2_high and build planes, that encapsulate the shape of the fur. These I keep as simply one poly for now per plane, that I add to one mat, and uv to one uv set.
I then duplicate and smooth these planes, and add a bend, which I bake out in xnormal as a bent normal map, that can be used in marmoset in the anisotropic direction map slots. Occasionally people paint these maps, but this method produces similar results and is much faster.

After baking (naming the planes fur_1_low, fur_2_low etc) i add a few edge loops to the planes, allowing me to ever so slightly bend the original planes, and twist them, to give it slightly more variety than a flat plane. It basically affects how the light will hit each plane, when slightly bent, this gives a much more dynamic look.

After exporting these planes, I use the alpha map and import the planes as the fbx, and the low poly geo of the Roman, to Zbrush, add the alpha of the hair as a texture, adjusting the transparency to suit, then create the most dense one as a IMM brush, and then Nanomesh. If the initial geo, the pants and arms, already have the texture applied, it is easy in Zbrush to visualise, and adjust the planes in the nano mesh settings to add a decent variety.
This basically gives you a base of planes of one plane, which you can import back into Maya, and populate by hand the rest of the planes to add more variety.

It’s a quick method, but effective. Reducing the time of populating by 3 quarters.
Finally, and testing in marmoset, the pants and arms are smoothed using a transfer attributes in maya, by selecting the bottom geo, and then the planes (combined into one) this allows the smoothness to follow the direction of the smoothing of the initial geo, and produces better results.

Again, I wont go into hair, since there are better tutorials out there. The Ploom for the helmet was created again with hair planes and xgen, but populated by hand and tested in marmoset throughout.

Apart from that, another cute trick I like to use when creating characters using marmoset, is fake Peach fuzz. I create this by either using xgen or zbrush fur, and sculpting small hair strands around all visible skin, such as face and arms, and in line with how the small hair would flow. I paint the hair white, and skin black, and then bake this in marmoset using again the low poly and this as a high.

Giving me a alpha map of hair around the body. This I add to substance when texturing, sometimes slightly in the skin layer, but mainly in my fuzz layer, that I can plug into marmoset later, as a slight edge highlight. In affect a similar way, but game ready peach fuzz.


I keep it subtle, but if the light hits it right, some of those edge hairs will be picked up, giving it that added realism.
Ok the final Blog I will post in a few days, with how I set up the lighting, pose and prepped the final assets to create the imagery below. This stage is not really needed when creating the model for a company, a tpose well lit and rendered will do (dependent on studio), but for portfolio I feel it’s a necessary to make the piece much more interesting and dynamic.


Anyway good luck with your own models and see you in a few days!

Adam
Hi,
I finished the texturing for the Roman today, so wanted to share the model so far, and the texture sheets etc. I still need to do all the hair, and fur elements. Buts its coming along.
Before delving into the imagery, for a nice guide to the texturing process, I would usually begin with ids set up, and simply add base textures of one layer with a block colour, and rough/metal value and test it in my chosen renderer (in this case marmoset and texturing in substance). After that, if happy, build upon it with finer textures, ao maps, edge and cavity etc. Until you have a area of texture well defined that you are happy with. I feel this is a area a good 10 minute video will be valuable for and useful for others, so will create one at a later date.
Anyway here is the model with finished textures. Its still WIP I need to do the hair. And after that the final poses for portfolio.


Sorry about the sound issues and my nerves, if i do any more hopefully they will be better quality over time.
Hi,
A small update. For anyone who follows me they would already see I posted on my Roman yesterday with the complete high poly sculpt.

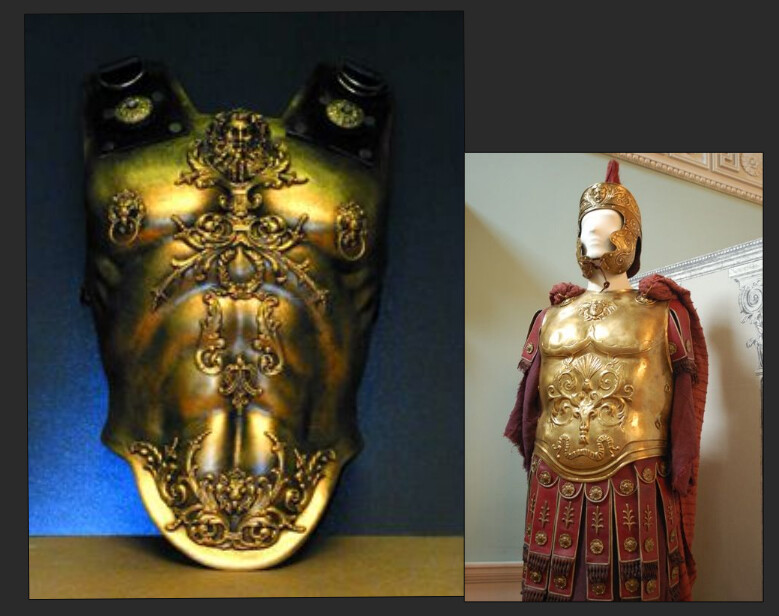
Here is a image of the sculpt, the rest are on the portfolio page.
To explain, the fur is placeholder and will be swapped out before baking. Its just to show what it will look like, and would be used for clients especially, being replaced by cards when the time comes. The clothing elements were created in marvellous designer. There are plenty of tutorials out there on how to prep clothing, but my usual method is to duplicate, zremesh, add sub ds to both versions of the clothing, project once, then add thickness, usually with panel loops, do the same with the old, and project again. But this method varies dependant on what I want to achieve at the time.
The gif below shows the general method of construction, I could have gone back and rendered off various stages on my incremental saves, but felt it wasn’t too necessary when you can see a rough process on the chest piece anyway. Other methods ive used usually involve methods ive shown on my backpack I created for my hiker, that there is a breakdown on in my portfolio. If anyone is curious about the entire construction, I could render off each incremental save of the ztl, and post this also as a gif. Just drop a comment.

Apart from that, the only unusual method I’ve used that I hadn’t really used before is making a displacement for the shoulder armour. This was done by quickly sculpting a shoulder piece, dropping to the lowest sub d, exporting this, fixing the uvs so that the elements I wanted to use had a large uv ratio, the rest scaled down and placed in a corner, and then after creating a basic shape in zbrush and layerin this in maya to form a repeating pattern, moving onto substance painter for the final repeating pattern placed onto the shoulder pads. After this I went back to zbrush, added a layer, added a morph, and applied the texture to the displacement, adjusting the values with the layers, and morphing out the edges which was quite easy due to the poly groups. If anyone wants to see this method in detail I can do a blog post on it with the varying stages, just drop me a comment on it.
Anyway thank you again. There has been a few requests for me to record some sessions. Sadly im very shy, and if recording I make a lot of mistakes, however perhaps during the texturing process, after retopo (I cant imagine you want to see ten hours of quad draw) I could record using substance painter and the dropping back and fourth to the final presentation software of marmoset. This and I can imagine the baking process might be handy for all, so will do something for them anyway.
Thank you
Adam
Ive began David Crosslands anatomy course from Mold 3D the last few weeks. This week i began working on the first element of the outer body, the arms. Here is my sculpts so far which i will build on through the course. Based on Bernini's David.


Hi all,

I created this hair using Mayas Xgen. The eyelashes, eyebrows and short hair sections I will use for the low poly later. But the long hair on the top of the head I will delete later and recreate using hair cards. Which will also be textured to look even better.
After the hair creation i import to zbrush, polygroup it into around 4 rough sections per hair subtool. This I will later colour as shown below to be varying base colours, which will allow the use of varying hair strand colour and rough values on the low polygon.

I was aiming for a quite stark, worn, soldier look, who has seen many things and is tired of war. Hopefully that aspect of the character im managing to convey even though I feel it could benefit from a small pass at retexturing later in substance when low poly.


For now, here is the head in the base. Note I feel the long top hair cards will need to be removable to allow for the helmet, but it isn’t that much of an issue and also allows the character to walk around helmet free if needed.

Thank you, I hope so far you are learning a little of my process for AAA game characters.
Hi,
Todays blog goes a little more technical into the process of head creation.

To begin I extract the head shape from the body blockout, and, choosing suitable reference, a combination of thin faced muscley men and worn torn soldiers, I firstly created a base ref to create from that I can set up on the floor planes, then sculpted the forms, until I was happy.

After I copied the mesh at lowest sub, uved, and used that as the base to place some texture xyz textures and displacements. Below is a link to a full tutorial explaining the process.
The texture edit software i used was substance painter, therefore allowing cloning of the base color, then the displacment and utility maps with the same setttings by dropping in the map to the base channel.
Interesting to note, i made a morph of the face for the texture projection with mouth closed and eyes closed, which i opened again after. I will in the end close the mouth after retopo, or high poly posing, but it simplifies the bake process.
I then polypainted the rest of the face and used pour alphas and micromaps (bought from texture xyz) to create and edit out the hair texture and add the neck details. Added slight variations of color to the eyes and sculpting in more finer details.
I did a similar process for the eyes, again using texture xyz maps, but extracting the pupil area as a mask then texture, that I used in photoshop to place the maps, which I imported back into zbrush for displacement and conversion to polypaint.
These renders I created in keyshot.

The next step is hair, as you can see hes very bald, even his eyelashes. For this step I will use xgen and again will either give breakdowns of the process or show where I learnt the process myself, as above.